
Accessibility: Canvas
Click the back arrow or here to jump back to the Making Content Accessible at ARC page.
Universal Design and Accessibility in Canvas
Building an accessible Canvas course is an essential step toward supporting your students. However when it comes to building your Canvas course, it is more productive to utilize a universal design lens, which more broadly addresses the many access issues that our students face based on their varied needs and experiences – without access, our students cannot learn. The good news is that many of the skills and tools used to build accessibility into your practice are useful in any content creating platform from Microsoft, Google, or Canvas! It’s just a matter of finding the tools in those platforms.
Creating accessible content in Canvas is all about organization, consistency, and format (University of Oregon Accessible Education Center). If you build these into the Canvas pages, assignments, quizzes, and discussions, then you will have an accessible Canvas course! Keep reading for more guidance on what organization, consistency, and format might look like in Canvas.
Organizing Canvas
The goal of having an organized course is to minimize frustration for students by making it easy and intuitive to find what they are looking for, quickly. This is helpful for all students, but especially important for students with varying cognitive and/or emotional disabilities.
- Layout should be clean, simple, and uncluttered.
- Chunk related information together; avoid long paragraphs of information
- Use informative but unique module, page, quiz, discussion, and assignment titles.
| Canvas Content | Problematic Names | Informative Page Names |
| Assignment | Assignment #3 | Week 11 – European Literature Assignment |
| Quiz | Linear Equations Quiz | Unit 4 Quiz (Linear Equations) |
| Discussion | Civil War Discussion | Discussion #4 – History of the Civil War |
Formatting Canvas Content
Canvas has built in accessibility tools that help to not only make the content accessible for students with disabilities, but all of your students. Formatting the content in Canvas is easy once you learn how to use the Styles tools in the Rich Text Editor. By formatting your Canvas content with accessibility in mind, it makes your course screen reader friendly, but also visually clear and informative.
Below are the many steps that you can take to improve the accessibility of your course and support student success:
| Accessibility Tips | Video Explanation |
| Use headings that are nested in the correct order:
| |
| Use the bulleted and numbered lists tools for lists.
| |
| Hyperlinks should be descriptive (e.g. American River College), instead of the actual URL.
| |
| Tables need to have a descriptive title and identified header rows, for screen reader accessibility. | |
| Embed videos, rather than use hyperlinks, whenever possible, but be sure to include a description of the video with a hyperlink (just in case the embedded video won’t play). | How to embed a video using a URL How to embed a video using Canvas Studio How to embed a video using the “Embed” option (first 2 minutes only) |
Accessible Multimedia and Attachments
When adding content into Canvas, the more that you can actually put into Canvas, rather than attachments and redirects, the better! The tools in Canvas make accessibility easier for faculty, but by maximizing content in Canvas, it also increases access for students because it reduces the need for them to download or link to another location.
- All documents should be accessible in the same way that the content in Canvas is accessible. See the Making Content Accessible (ARC) for more information how to make documents accessible.
- All images should have appropriate alt-text or long descriptions. See Accessibility: Images, Graphs, and Charts for more information how to make images accessible.
- All videos should have captions; see Accessibility: Captioning Your Videos for more information.
- All audio should have transcripts; see Accessibility: Transcripts for Audio and Podcasts (coming soon)!
Checking Accessibility in Canvas
Canvas has several built-in accessibility checkers that you should get familiar with and use whenever creating new or reviewing existing content. These tools quickly and easily identify errors, possible issues, and even help you to fix them.
- Rich-Text-Editor Accessibility Checker
- Ally
- Pope Tech Accessibility Guide
- Pope Tech Accessibility Dashboard
However there are some errors that these checkers do not capture, which require you to manually review yourself.
Rich-Text-Editor Accessibility Checker
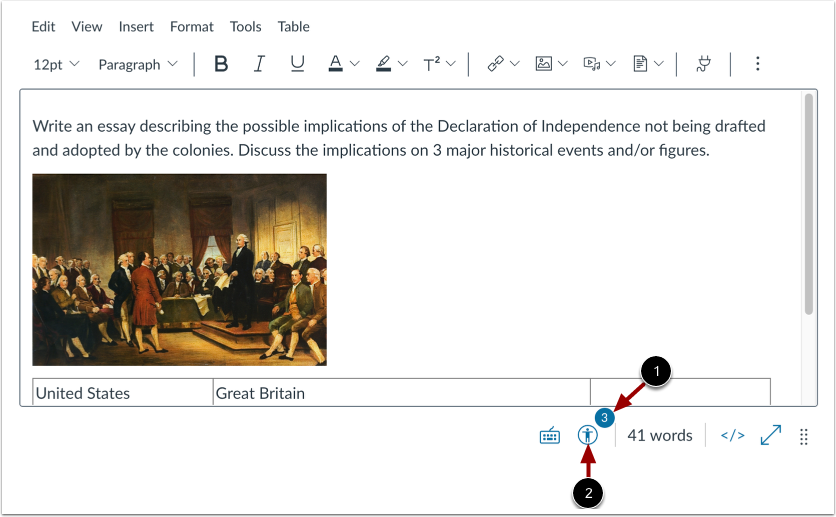
This tool should be used in your first review and the icon (a stick figure in a circle) can be found in the lower right corner of the rich text editor (see image below). For instructions how to use this tool, visit How Do I Use the Rich Text Editor Accessibility Checker as an Instructor?
Ally Accessibility Tool
There is another tool built into Canvas that allows you to review all your files and pages at a glance, including images, stored in your Canvas course – it’s called Ally.
Click on Files in the navigation menu (or Pages) and you will see all of your files in their stored locations. Simply look for the Ally “accessibility” score (which looks like a speedometer or gas gauge in a car):

- Green/arrow to the right – good accessibility
- Orange/arrow in the middle – Some accessibility
- Red/arrow to the left – Low Accessibility
When you click on the speedometer, it will list any issues with the file (or picture) and you can fix it right there! For more information how to use this tool, visit the Ally for Instructors (Google Doc).
- To support your students in using Ally for alternate formats, share the Ally for Students (Google Doc).
Pope Tech Accessibility Guide
Your second level review is at the bottom of the Canvas content, next to the “Cancel” and “Save” or “Publish” buttons at the bottom right corner. This is a more robust tool however it can also be a bit more detailed, which may feel overwhelming. However if there was one tool that you were going to use, this would be the one! For instructions how to use this tool visit Pope Tech Web Accessibility in Canvas (Western Washington University).
Pope Tech Accessibility Dashboard
You can also use the Pope Tech Accessibility Dashboard to get an overview of the total number of accessibility errors and alerts in your course. In addition the Dashboard will identify the files and content within your Canvas course that contain the errors, then redirect you to remediate that content using their Accessibility Guide. Visit the Pope Tech Dashboard on the ITC website for more information and instructions about how to use this accessibility tool.
Additional Support
If you are still looking for more help there are many resources on the Internet, but below are a handful that present the same information in varied ways.
- Accessibility in Online Course Design (Instructure)
- Canvas General Accessibility Guidelines
- Canvas Accessibility
- Canvas Accessibility Checker in the Rich Content Editor
- Canvas Rich Content Editor (Penn State)
- Creating Accessible Canvas Content (Emerson College) – great explanation with visual instruction.
Canvas Accessibility Training
You might find yourself wanting to get more in-depth, hands-on training; below are a few free options available:
- 5-Day Challenge: Creating Accessible Canvas Content (Self-Paced)
- Creating Accessible Course Content (Self-Paced) – check for available trainings
- CVC Accessibility Essentials Self-Paced Courses
- PopeTech Instructor Accessibility Guide (Self-Paced)
Click the back arrow or here to jump back to the Making Content Accessible at ARC page.